AI Agents
Installing the AI-Powered Chatbot Agent
Follow these steps to install and configure the AI-powered chatbot agent on your website. This guide will help you integrate the chatbot seamlessly, whether as an embedded chat window or a floating support button, while maintaining security and customization options.
Step 1: Add an AI Agent
To get started, you need to create a new AI-powered chatbot agent within the Sidecar CX platform.
- Log in to the Sidecar CX web portal.
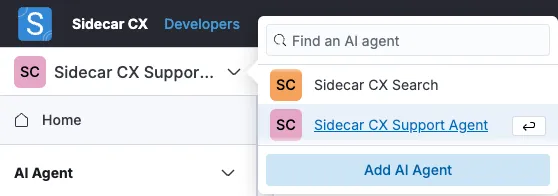
- Click on the Agent dropdown in the navigation menu.

- Select "Add AI Agent".

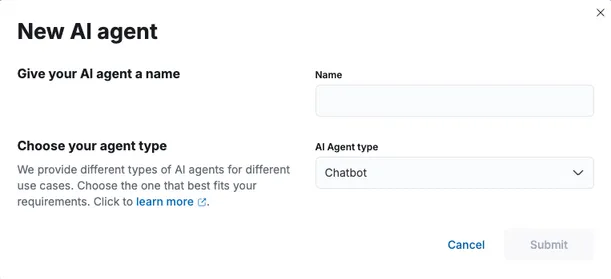
- Provide a meaningful name for your AI Agent to help you identify it later.
- Select "Chatbot" as the agent type to enable conversational AI functionality.
Step 2: Customize the Appearance
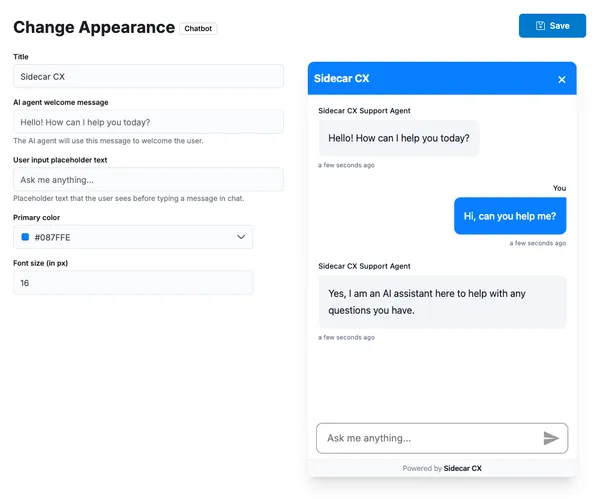
Your chatbot should match the look and feel of your website. The preview panel allows you to tweak the appearance before deployment.
- Use the preview panel to customize the chatbot's design.
- Adjust colors, text, and layout to align with your brand.
- Once satisfied with the customization, click Save to store your changes.

Step 3: Configure Security Settings (CORS)
Security is essential when embedding AI-powered widgets on your website. By configuring CORS settings, you ensure that only your approved domains can access your AI Agent.
- Navigate to the Security tab.
- Enter the domain(s) where you will be hosting the chatbot widget.
Why is this required?
For security purposes, our servers enforce Cross-Origin Resource Sharing (CORS) policies. This prevents unauthorized sites from embedding your AI Agent, protecting against security threats such as cross-site scripting (XSS) and unauthorized data access.
Step 4: Get the Script Tag
Once your chatbot agent is configured, you'll need to embed it on your website.
- Go to the General tab.
- Copy the script tag provided. This script will allow your website to load the AI-powered chatbot widget seamlessly.
<script src="http://ai-agent.sidecarcx.com/widget.js?id=<YOUR_AGENT_ID>" async></script>
Step 5: Add the Chatbot Widget to Your Website
Now it's time to integrate the chatbot widget into your website's structure. We offer two options to add the chatbot to your website, either as a floating button or embedded directly into your website.
Floating Button
- Paste the script tag anywhere in your HTML file, typically before the closing
</body>tag for better performance. - The chatbot will automatically appear as a floating button on your website by adding a child
element to the
<body>tag.
Embed Directly Into Your Website
- Paste the script tag anywhere in your HTML file, typically before the closing
</body>tag for better performance. - Add the following
<div>element where you want the chatbot widget to appear:
<div id="scx-chatbot" style="width:640px;height:480px;" />
- Update the script tag to include a custom ID to find in your website to mount the chatbot widget.
For example, if you used
scx-chatbotas the ID, the script tag should be updated as follows:
<script src="http://ai-agent.sidecarcx.com/widget.js?id=<YOUR_AGENT_ID>&mount=scx-chatbot" async ></script>
- The script will automatically find the
<div>with the IDscx-chatbotand insert the chatbot widget as a child element. You can choose any ID you prefer for the<div>element. It must be a unique ID present in your website's HTML.
Step 6: Adjust Styling of the Embedded Chatbot
This only applies if you choose to embed the chatbot widget directly into your website.
To ensure the chatbot widget displays correctly, you must define the height and width of the
<div>. Additional styling, such as margins and padding, can be applied as needed.
- Required: Set the
heightandwidthproperties to ensure proper widget display. - Optional: You may apply margin and padding to control spacing.
- Avoid applying additional styles that may interfere with the widget's design and functionality.
Need Help?
Once these steps are completed, your AI-powered chatbot widget will be live on your website! 🚀 Need help? Contact our support team for assistance.