AI Agents
Installing the AI-Powered Search Agent
Follow these steps to install and configure the AI-powered search agent on your website. This guide will help you integrate the search functionality smoothly while maintaining security and customization options.
Step 1: Add an AI Agent
To get started, you need to create a new AI-powered search agent within the Sidecar CX platform.
- Log in to the Sidecar CX web portal.
- Click on the Agent dropdown in the navigation menu.

- Select "Add AI Agent".

- Provide a meaningful name for your AI Agent to help you identify it later.
- Select "Search" as the agent type to ensure you're setting up a search-based experience.
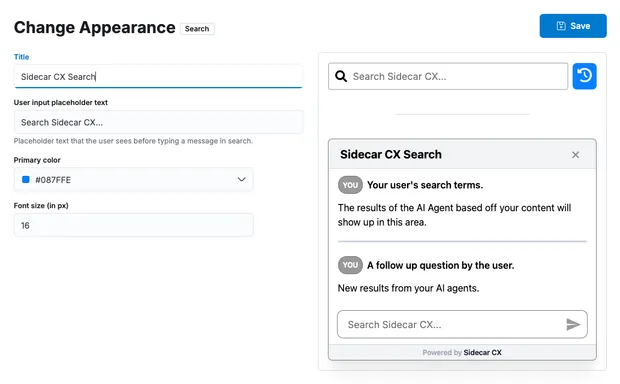
Step 2: Customize the Appearance
Your search widget should match the look and feel of your website. The preview panel allows you to tweak the appearance before deployment.
- Use the preview panel to customize the search widget's design.
- Adjust colors, text, and layout as needed.
- Once satisfied with the customization, click Save to store your changes.

Step 3: Configure Security Settings (CORS)
Security is crucial when embedding AI-powered widgets on your website. By configuring CORS settings, you ensure that only your approved domains can access your AI Agent.
- Navigate to the Security tab.
- Enter the domain(s) where you will be hosting the search widget.
Why is this required?
For security purposes, our servers enforce Cross-Origin Resource Sharing (CORS) policies. This prevents unauthorized sites from embedding your AI Agent, protecting against security threats such as cross-site scripting (XSS) and unauthorized data access.
Step 4: Get the Script Tag
Once your search agent is configured, you'll need to embed it on your website.
- Go to the General tab.
- Copy the script tag provided. This script will allow your website to load the AI-powered search widget seamlessly.
<script src="http://ai-agent.sidecarcx.local:4200/search-widget.js?id=<YOUR_AGENT_ID>" async ></script>
Step 5: Embed the Search Widget on Your Website
Now it's time to integrate the search widget into your website's structure.
- Paste the script tag anywhere in your HTML file, typically before the closing
</body>tag for better performance. - Add the following
<div>element where you want the search widget to appear:
<div id="scx-search" style="width:240px;height:40px;" />
- The script will automatically detect this
<div>and insert the search widget as a child element within this<div>tag.
Step 6: Adjust Styling
To ensure the search widget displays correctly, you must define the height and width of the
<div>. Additional styling, such as margins and padding, can be applied as needed.
- Required: Set the
heightandwidthproperties to ensure proper widget display. - Optional: You may apply margin and padding to control spacing.
- Avoid applying additional styles that may interfere with the widget's design and functionality.
Need Help?
Once these steps are completed, your AI-powered search widget will be live on your website! 🚀 Need help? Contact our support team for assistance.